

How to Stop a Dripping Tap: A Simple Homeowner Guide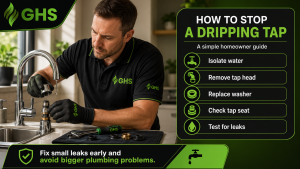
A dripping tap may seem like a small problem, but over time it can become annoying, waste water and potentially lead to bigger plumbing issues.
In many cases, a dripping traditional tap is caused by a worn washer. Replacing the washer can often stop the leak, provided the tap seat and internal parts are still in good condition.
Some basic plumbing tasks may be suitable for confident homeowners, but it is important to work carefully. If you are unsure, cannot isolate the water, or the tap continues to leak, it is always best to contact a professional plumber.
Why You Should Not Ignore a Dripping Tap
A leaking tap is easy to put off, especially if it is only dripping slowly. However, small plumbing problems can quickly become more frustrating and more expensive.
A dripping tap can:
- Waste water
- Increase water bills if you are on a meter
- Cause staining around sinks or basins
- Lead to limescale build-up
- Get worse over time
- Indicate worn internal tap parts
Dealing with a leaking tap early is usually much easier than waiting until the problem becomes more serious.
What Causes a Tap to Drip?
The cause depends on the type of tap.
On many older-style taps, the drip is often caused by a worn rubber washer. Over time, the washer can harden, split or stop sealing correctly.
Other common causes include:
- A damaged tap seat
- Limescale build-up
- Worn tap inserts
- Loose internal parts
- Faulty ceramic cartridges
- General wear and tear
If the tap has a ceramic cartridge rather than a traditional washer, replacing the washer will not solve the issue. The cartridge may need replacing instead.
Tools You May Need
Before starting, make sure you have the correct tools and replacement parts.
You may need:
- Replacement tap washer
- Screwdriver
- Adjustable spanner
- Grips
- Cloth or towel
- Tap reseating tool
- Small container for screws
- Torch
- PTFE tape if required
Always make sure the replacement washer is the correct size and type for the tap.
Step 1: Isolate the Water Supply
First, turn off the water supply to the tap.
This can usually be done using isolation valves on the pipework leading up to the tap, if they are fitted. These valves are often chrome or silver in colour and may need turning with a flat screwdriver.
If there are no isolation valves, you may need to turn off the main stop tap. This can often be found under the kitchen sink, in a downstairs bathroom, in an airing cupboard, utility area or near where the water main enters the property.
Once isolated, open the tap to release any remaining water and check that the water has stopped.
Step 2: Remove the Tap Head
Remove the tap head, handle or lever.
On many taps, there may be a small screw hidden under a decorative cap, button or cover. Carefully remove this and lift off the handle.
Keep all screws and small parts safe so they do not get lost.
Step 3: Remove the Tap Insert
Using a suitable spanner or grips, carefully turn the tap insert anti-clockwise to remove the working mechanism from the tap body.
Hold the tap body steady while doing this.
This is important because if the tap twists, it could loosen the tap connector underneath the sink or basin and create another leak.
Step 4: Replace the Tap Washer
Once the tap insert has been removed, locate the washer at the bottom of the insert.
The washer is normally black, round and made from rubber. It may pull off by hand, or it may be held in place with a small screw.
Remove the old washer and replace it with a new washer of the same size and type.
Step 5: Check the Tap Seat
The washer seals against the tap seat inside the tap body.
If the tap seat is covered in limescale, worn, cracked or uneven, the new washer may not seal properly. This means the tap could continue dripping even after the washer has been replaced.
A tap reseating tool can be used to clean the seat. This carefully removes limescale and rough areas to create a smoother surface.
If the tap seat is badly damaged, cracked or cannot be made smooth, the tap may need replacing.
Step 6: Refit the Tap Insert
Refit the tap insert by turning it clockwise back into the tap body.
Tighten it securely, but do not over-tighten it.
Make sure the tap body is held steady while tightening to avoid disturbing the pipework underneath.
Step 7: Refit the Tap Head
Replace the tap head, handle or lever.
Refit any screws, covers or decorative caps that were removed earlier.
Check that the tap turns on and off smoothly.
Step 8: Turn the Water Back On
Slowly turn the water supply back on.
Check the tap to see whether the drip has stopped. Also check underneath the sink or basin to make sure no tap connectors or pipework have been disturbed.
If the tap is still dripping, there may be another issue with the tap seat, insert, cartridge or tap body.
When Should You Call a Plumber?
You should contact a plumber if:
- You cannot isolate the water
- The tap continues dripping after the washer is replaced
- The tap body moves when you try to undo it
- There is a leak under the sink or basin
- The tap seat is damaged
- The tap has a ceramic cartridge
- You are unsure which parts are required
- The tap is old, seized or heavily corroded
Trying to force old fittings can sometimes turn a small tap repair into a bigger plumbing problem.
Do You Need a New Tap Instead?
Sometimes replacing a washer is not enough.
A new tap may be the better option if the existing tap is badly worn, corroded, damaged, difficult to use or leaking from several places.
Modern taps can improve reliability, appearance and ease of use, especially in kitchens, bathrooms and utility rooms.
Plumbing Help from GHS Group
At GHS Group, we help homeowners with dripping taps, tap repairs, leaking toilets, blocked drains, washing machine connections and general plumbing maintenance.
A small drip today can become a bigger issue tomorrow, so it is always worth dealing with plumbing problems early.
For reliable plumbing support across Gosport, Fareham, Portsmouth and Hampshire, contact GHS Group today.
Call 01329 285993
Leave a Reply